
How to add audio (music, sound effects & narration) to presentation in PowerPoint 2007 – 2010
- Introduction
- Audio file formats — embedded and linked
- Insert audio file into presentation
- Adjust the audio options
- Play across multiple slides
- Playing control
- Record narration
- Final
Introduction
Music is an important avenue to create a catchy presentation. You can use background music to grab the audience's attention and set the tone for the rest of the presentation. Or you can make a "final touch" by adding the right sound effect. However, attaching audio files to a PowerPoint presentation is a very simple process that takes only a few clicks to complete. All you need is well-chosen music and a little time to understand how it works.
Audio file formats — embedded and linked
Most versions of PowerPoint support the following audio file formats: WAV, MP3, WMA, AIF.
However, there is a difference in working with the file formats:
WAV: files can be embedded in presentation, but will increase it's size (1 min of audio = 10MB). It is possible to embed WAV files that are up to and no more than 50MB in size.
MP3, WMA, AIF:
Such audio files can only be linked, but not embedded into presentation. Put audio files into the same folder as a presentation and use them together with project.
Such audio files can only be linked, but not embedded into presentation. Put audio files into the same folder as a presentation and use them together with project.
To distribute presentation on CD/DVD copy a presentation file along with audio files. To send a presentation via e-mail use zip archive to store all project files and e-mail them.
Insert audio file into presentation
If you want music to play throughout the whole presentation, select the slide to which you want to add an audio track (by default a first slide), then choose the instruction for your version of PowerPoint.
PowerPoint 2007
1
Open the Main Menu -> Insert -> Movies and Sounds -> Sound from File and select the music file you want to insert.


2
Once a file is selected, perform one of the following actions to start the sound in the slideshow:
Click Automatically to make your audio playing when you show the slide. If there are other media effects on the slide, such as an animation, the audio plays after that effect.
Choose When Clicked, the music will start playing when you double click on the sound icon and stop when the file ends or when you advance to the next slide.

PowerPoint 2010
1
Open the Main Menu -> Insert -> Video and Audio -> Audio from File


After you add a sound to the presentation a small speaker icon will appear in the center of the slide.
2007
2010
Adjust the audio options
Let's take a closer look how is possible to adjust the audio playing options in PowerPoint.
2007
Select audio by clicking on speaker icon. On the Main Menu, click Sound Tools -> Options and you will see the Sound Options panel:

You can listen to the audio preview, setup slide show volume (recommended to select Medium or Low value at Slide Show Volume) or change sound options:
- Hide During Slide Show — audio icon will be hided during presentation.
- Loop Until Stopped — audio will play looping sound until it stops by the clicking or by the ending of presentation.
- Play Sound:
- Automatically — start playing at the beginning of slide or presentation
- When Clicked — start playing by click on sound icon during presentation.
- Play across Slides — play audio through the whole presentation or from the slide to slide.
- Max Sound File Size — if you are working with WAV file, you can also setup max file size (in kilobytes) to embed into presentation. All you need is enter a number that is bigger than a size of your audio file. For example: audio file size is 7MB ~ 7000KB, so enter the number 7000.
2010
Select the speaker icon. On the Main Menu select Playback to open the Audio Setup panel:
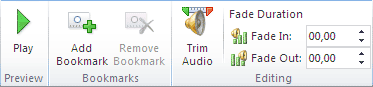
- Play — listen to an audio preview.
- Add/Remove Bookmark — setup any audio file positions and start playing from these positions
- Trim Audio — cut the audio from the beginning and the end to play a part of file.
- Fade In/Out — start playing the audio with fade in and finish with fade out effects.
- Volume — setup audio volume, louder is not always better.
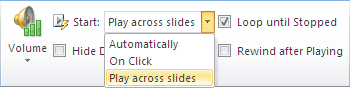
- Start:
- Automatically — start playing the audio from the beginning of slide or presentation.
- On Click — start playing by click on sound icon during presentation.
- Play across slides — play audio through the whole presentation or across multiple slides. See below for more information.
- Hide During Slideshow — speaker icon will not appear during the presentation.
- Loop Until Stopped — audio will play looping sound until it stops by the double clicking or by the ending of presentation.
- Rewind after Playing — rewind the audio after it has played.
Play across multiple slides
For example, you want complete your presentation with music between 5th and 10th slides.
2007
1
Insert audio file into 5th slide and select it.
2
Choose Sound Tools -> Options, on the sound panel select Play Sound — Play across slides. Turn on checkbox at Loop Until Stopped.
3
On the Main Menu select Animations -> Custom Animation and click button on.

4
Custom Animation panel will open at the right side. Click at the audio file name, at drop-down menu select Effect Options to open Play Sound panel.

5
Setup next values: Start playing - > From beginning (current slide #5). Stop playing -> After 5 slides.

2010
1
Insert audio file into 5th slide and select it.
2
Select Audio Tools -> Playback, on the sound panel select Start — Play Across Slides. Turn on checkbox at Loop until Stopped.
3
On the Main Menu select Animations -> Animation Pane button on.

4
Custom Animation panel will open at the right side. Click at the audio file name, select Effect Options to open Play Audio panel at drop-down menu.

5
Setup next values: Start playing - > From beginning (current slide #5). Stop playing -> After 5 slides.

Playing control
You can control the start of audio playing with trigger elements such as title or image. Once triggers are setup correctly, audio will play by clicking on them.
2007
1
Select the speaker icon and go to Main Menu -> Animations -> Custom Animation. Click on the name of audio file and select Timing at drop-down menu .
2
Click on Triggers -> Start effect on click of and select an element from the current slide to make a trigger for the audio playing.

2010
1
Select the audio icon and go to Main Menu -> Animations -> Trigger.

2
Click On Click of and select an element from the current slide to setup a trigger for the audio playing.

Record narration
The process of recording narration for your presentation is the same for both versions of PowerPoint. It will be great if you have a stand-alone microphone. The quality of built-in microphone recording is lower than the recording outside.
Anyway, you can do it:
1
On the Main menu Insert -> Sound (Audio), select Record Sound.
2
Type the name of your voice narration and click the red circle button to start
the recording. When narration is complete, stop the recording by clicking the blue box button. Press Ok to save the narration into presentation.

The recorded narration will be embedded into your PowerPoint presentation file.
Please note that this digital narrative can not be longer than 5 minutes (near 500 words), because of default setting in PowerPoint to embed a WAV files up to 50MB.
It is recommended to record narration outside of PowerPoint and then insert it into presentation an audio file. You may use freeware software like Audacity or something else. Use MP3 files to save a narration — lot less space and they are still good quality.
Final
Hope this simple step-by-step tutorial was helpful for you and gave a great boost to your skills of adding audio files to a PowerPoint presentation. Now it's time to find some good presentation music right here.
- 🗣️ Voice Greeting Generator
- FIND MUSIC
- AI Powered Search
- On Hold Music
- Music For Podcasts
- Music For Presentations
- Music For Slideshows
- All Time Bestsellers
- Free Music Downloads
- HELP
- How it Works
- FAQ
- License & Pricing
- License Agreement
- Terms of Service
- Privacy Policy
- Contact Us
- COMPANY
- About Us
- Blog
- Our Composers
- Sell Your Music